Alligatoring Paint on Exterior Surfaces: Causes and Fixes
If you’ve noticed your home’s exterior paint cracking in a distinctive pattern that looks like alligator skin, you’re dealing with a common issue known as alligatoring. This problem not only affects the aesthetic appeal of your house but can also signal underlying issues that need prompt attention to prevent further damage. In this guide from The Well Painted Home, we’ll explain what alligatoring paint is, why it happens on exteriors, and provide a step-by-step fix using trusted products from Sherwin-Williams and Benjamin Moore. Whether you’re a DIY enthusiast or hiring a professional, these tips will help restore your home’s curb appeal.
What is Alligatoring Paint?
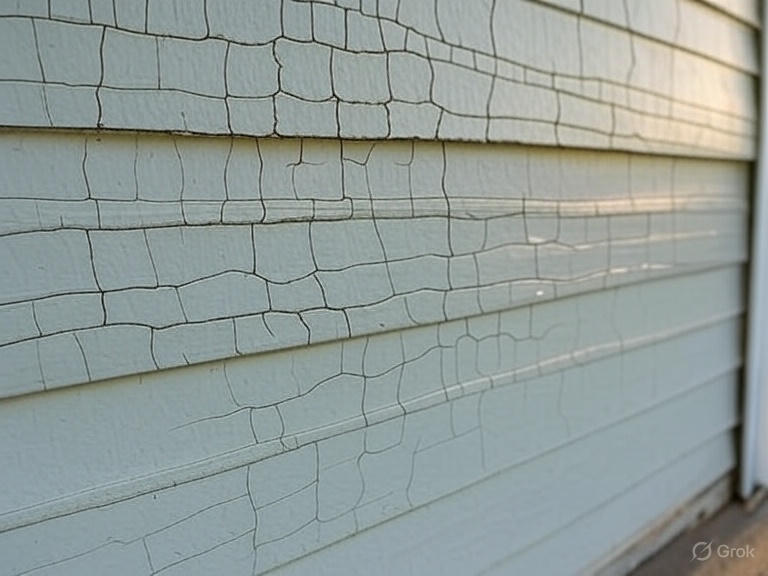
Alligatoring paint refers to a patterned cracking in the surface of the paint film that resembles the rough, scaly skin of an alligator. These cracks typically form in a network of irregular lines and can vary in depth, sometimes affecting only the top layer of paint without exposing the underlying surface. 2 On exterior surfaces like siding, trim, or walls, this issue is particularly common due to exposure to the elements.
Unlike simple peeling or flaking, alligatoring creates a textured, cracked appearance that can make your home look aged and neglected. It’s more prevalent in older homes with multiple layers of paint, especially those originally coated with oil-based formulas.
Common Causes of Alligatoring on Exterior Paint
Alligatoring doesn’t happen overnight—it’s usually the result of several factors building up over time. Understanding the root causes can help you prevent it in future paint jobs:
- Incompatible Paint Layers: Applying a hard, rigid topcoat (like alkyd or oil-based paint) over a softer, more flexible undercoat can cause the top layer to crack as the bottom expands and contracts. 5
- Aging and Weathering: Natural aging of oil-based paints, combined with extreme temperature fluctuations, UV exposure, and humidity, leads to brittleness and cracking. 8
- Moisture Issues: Painting over damp or wet surfaces allows trapped moisture to escape, causing the paint to crack. This is less common with latex paints but still a risk on exteriors. 3
- Poor Surface Preparation: Skipping proper cleaning, priming, or sanding before repainting can lead to adhesion failure.
- Build-Up of Layers: Multiple coats of paint without removal of old, failing layers exacerbate the problem.
Exterior surfaces are especially vulnerable because they’re constantly battling rain, sun, wind, and temperature swings. If left untreated, alligatoring can lead to moisture infiltration, wood rot, or further structural damage.
How to Fix Alligatoring Paint on Your Exterior: Step-by-Step Guide
Fixing alligatoring requires thorough preparation to ensure the new paint adheres properly and lasts. The key is removing as much of the damaged paint as possible, priming effectively, and using high-quality exterior paints. We’ll recommend products from Sherwin-Williams and Benjamin Moore, both renowned for their durable formulas suited for exterior repairs.
Step 1: Assess and Prepare the Surface
- Inspect the affected areas to determine the extent of the cracking. Test for lead paint if your home was built before 1978, as older layers may contain it—consider professional testing or abatement.
- Remove loose or flaking paint using a scraper, wire brush, or power sander. For severe cases, use a heat gun or chemical paint remover, following safety guidelines. 14 Aim to strip down to a stable substrate, but if complete removal isn’t feasible, smooth the surface as much as possible.
- Clean the area thoroughly with a pressure washer or mild detergent to remove dirt, mildew, and residue. Allow the surface to dry completely—moisture is a major culprit in recurring alligatoring.
Step 2: Repair and Smooth
- Fill any deep cracks or holes with an exterior-grade filler or caulk.
- Sand the surface smooth to create a even base. Wear protective gear to avoid inhaling dust.
- If the cracking is extensive, consider skim coating with a high-build primer or filler for a level finish. 15
Step 3: Apply Primer
Priming is crucial for adhesion and to prevent future cracking. Choose a bonding primer designed for problematic surfaces.
- Sherwin-Williams Recommendations:
- Extreme Bond Primer: Ideal for glossy or hard-to-paint surfaces, it provides excellent adhesion and helps seal cracks. Apply one coat for best results. 25
- Multi-Purpose Interior/Exterior Latex Primer/Sealer: Great for wood or masonry exteriors, offering good holdout and flexibility.
- Exterior Oil-Based Wood Primer: Use this for oil-over-oil scenarios or severe weathering. 19 For masonry, try LOXON Concrete & Masonry Primer/Sealer.
- Benjamin Moore Recommendations:
- Fresh Start High-Hiding All Purpose Primer: This versatile acrylic primer offers superior adhesion and stain-blocking, perfect for exterior wood or siding. 28
- Fresh Start Premium Exterior Primers (Acrylic or Alkyd): Choose acrylic for flexibility in humid climates or alkyd for better penetration on aged surfaces. 31
- For masonry, use Ultra Spec Exterior Masonry Primer.
Apply the primer in even coats using a brush, roller, or sprayer, and let it dry as per the product instructions (typically 24 hours).
Step 4: Apply Topcoat Paint
Once primed, apply two coats of premium exterior paint for durability and weather resistance.
- Sherwin-Williams Recommendations:
- Duration Exterior Acrylic Latex: Self-priming in some cases, it offers excellent fade resistance and mildew protection—ideal for long-lasting results on exteriors. 19
- Emerald Exterior Acrylic Latex: Provides a smooth finish with advanced stain-blocking and flexibility to handle expansion/contraction.
- SuperPaint Exterior Acrylic Latex: A budget-friendly option with good coverage and dirt resistance.
- Benjamin Moore Recommendations:
- Aura Exterior Paint: Known for its Color Lock technology, it resists fading and cracking while providing superior coverage. 10
- Regal Select Exterior: Offers excellent flow and leveling, with moisture-resistant properties for humid areas.
- ben Exterior: An affordable, low-VOC option with good adhesion and weatherproofing.
Paint on a mild day (50-85°F) with low humidity to avoid rapid drying, which can cause new issues. Use high-quality tools for even application.
Tools and Safety Tips
- Essential Tools: Scraper, sander, pressure washer, brushes/rollers, drop cloths.
- Safety: Wear gloves, masks, and eye protection. If using chemical removers, ensure good ventilation.
- Pro Tip: For large areas or severe damage, consult a professional painter to avoid costly mistakes.
Preventing Future Alligatoring
To keep your exterior looking fresh:
- Use compatible paint systems (e.g., latex over latex).
- Maintain proper ventilation and moisture control around your home.
- Repaint every 5-10 years with quality products.
- Inspect annually for early signs of wear.
By addressing alligatoring promptly with the right preparation and products from Sherwin-Williams or Benjamin Moore, you can achieve a beautiful, durable finish. At The Well Painted Home, we recommend these brands for their proven performance in real-world conditions. If you’re tackling this project, share your before-and-after photos in the comments—we’d love to see your results!
Leave a Reply